Module 11 - Sharing Tools
At last, the end is near! That's right, folks -- "Sharing Tools" is our last topic covered in GIS5103-GIS Programming for the 2017 Summer Semester (before our Final Project, that is). In this lesson, we focused on learning the standards and recommended folder structures and filepaths to share tools. There are three different ways to share tools:
- by sharing the original folder within a compressed file (e.g. .zip or .gpk);
- by placing files on a local network directory; and/or
- by publishing the toolbox as a geoprocessing service using ArcGIS for Server (which can be assessed via the web).
Furthermore, we learned that there are two major advantages of embedding (or importing) a script into a script tool:
- it allows you to more easily share the tool with GIS users, specifically because all that has to be sent is the toolbox, instead of a zipped file containing the toolbox with the associated scripts’ folder; and
- embedding turns on the capability to password-protect the script tool, this means that anyone whom has access to the tool will be prevented from editing or even seeing the script unless they have (or know) the password.
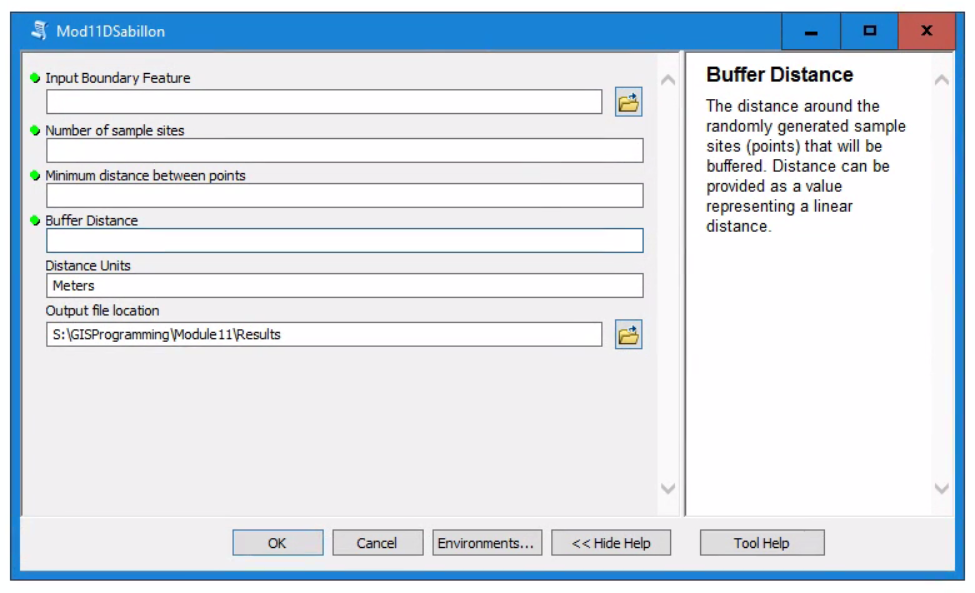

For our lab assignment, we were tasked to share a tool by only sending a toolbox (.tbx) file. In order to achieve this, we had to make some slight modifications to the associated Python script. Here we learned the differences and similarities between the arcpy.GetParameter() and sys.argv[] functions. Also, we learned how to add "dialog explanations" for each of the parameters in our tool, as well as embed (or import) a script, and password-protect it. Above is a screenshot of the tool I shared, along with an example of a dialog explanation for the parameter "Buffer Distance".
As the paramaters suggest, the purpose of this tool is to create randomly placed points (the user chooses this number) inside of a boundary feature class, then creates buffers around those points with a minimum distance between the points (as desired). After running the script, you get the map results as show on the left, the results dialog box as shown below.
As the paramaters suggest, the purpose of this tool is to create randomly placed points (the user chooses this number) inside of a boundary feature class, then creates buffers around those points with a minimum distance between the points (as desired). After running the script, you get the map results as show on the left, the results dialog box as shown below.

Closing Thoughts
The most
useful thing I learned about using Python in ArcGIS is the ability to
understand syntax. Before this class, I didn’t realize that writing Python code
entailed thinking (and writing it) backwards. This is especially important when
setting-up/assigning variables at the beginning of a script so that they can easily be
replaced with new ones, if need be, without needing to edit an entire script of
hard-coded values. Other very awesome, and useful things I learned include:
converting a model (from ModelBuilder) into a script, creating tools from a
Python script (can’t get enough of this one), and now knowing that for
virtually every ArcGIS tool in ArcToolbox, I can access its code syntax (with a
provided code sample) by either using the ArcGIS Help button through the tool,
or by calling in a tool in the ArcPy Interactive Window, and looking at the Help
Window. It's been a tough semester, but extremely rewarding. Thanks for GIS-journeying with me!
Comments
Post a Comment